Building Your Dream Humidor: Custom Cigar Box Woodworking Plans
Hey there, fellow cigar aficionado! So, you're thinking about building your own humidor? Fantastic! There's nothing quite like the satisfaction of crafting something beautiful and functional with your own two hands, and a custom-built humidor is the ultimate testament to your dedication to the art of cigar enjoyment. This isn't just a box; it's a sanctuary, a climate-controlled haven for your precious stogies. Let's dive into the world of humidor woodworking, and I'll walk you through the process step-by-step.
Choosing Your Wood: The Heart of Your Humidor
The wood you choose is paramount. It's not just about aesthetics; the wood's properties directly impact your humidor's ability to regulate humidity. Spanish cedar is the undisputed king. Its naturally aromatic oils are fantastic at maintaining humidity and imparting a subtle, pleasant scent to your cigars. But it can be pricey. Don't despair! There are excellent alternatives.

Spanish Cedar: The Gold Standard
Spanish cedar is readily available in various forms – planks, sheets, even pre-cut pieces designed specifically for humidor construction. It's relatively easy to work with, albeit a little softer than some hardwoods. The beautiful reddish-brown hue is gorgeous, and the aroma alone is worth the investment.
Alternative Woods: Exploring Your Options
If Spanish cedar breaks the bank, don't fret. Mahogany is a close second, offering a similar aesthetic and relatively good humidity retention capabilities. Red cedar (not to be confused with Spanish cedar) can also be used, but its aroma is stronger and might overpower your cigars. Oak, while a beautiful hardwood, requires more advanced sealing techniques to prevent leakage and maintain humidity. Finally, you could even explore exotic hardwoods like rosewood or zebrawood for a truly unique piece, but keep in mind their cost and potentially increased difficulty in working with them.
Designing Your Custom Cigar Box: Size and Style
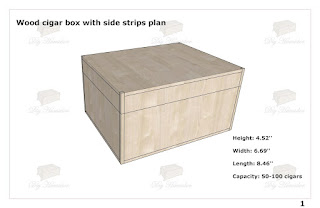
Before you even pick up a saw, you need a plan. How many cigars do you want to store? What size and shape humidor best fits your space and style? A simple rectangular box is easiest for beginners, while more complex shapes allow for greater creativity. Consider:
- Capacity: Measure your cigar collection to determine the necessary interior dimensions.
- Style: Traditional, modern, rustic – the design choices are limitless. Sketch your ideas!
- Features: Will you include a hygrometer, humidifier, dividers, or a drawer for accessories?
Once you have a solid design, create detailed drawings – including dimensions for each piece. This is crucial for accurate cutting and assembly.
Building Your Humidor: A Step-by-Step Guide
Now for the fun part! This assumes you have basic woodworking tools (saw, chisels, sandpaper, clamps, etc.). If you're a complete novice, consider practicing on scrap wood first.
Cutting and Shaping the Wood
Carefully cut your wood pieces according to your design drawings. Pay close attention to accuracy; even small discrepancies can affect the final fit and seal. Sand all edges and surfaces smooth for a professional finish.
Assembling the Humidor
This is where careful joinery comes into play. Consider using techniques like rabbet joints, dado joints, or even simple butt joints (with plenty of glue!). Ensure your joints are tight and secure to create a leak-proof seal.
Sealing the Humidor
This is arguably the most critical step. A poorly sealed humidor will lose humidity rapidly, rendering it useless. You'll want to apply several coats of a high-quality, food-safe sealant. Shellac is a popular choice for its compatibility with wood and its ability to create a durable, waterproof barrier. Consider using multiple thin coats rather than one thick coat for better penetration and a smoother finish.
Adding Finishing Touches
Once the sealant is thoroughly dry, you can sand the humidor smooth again. Consider adding a final coat of wax or oil for extra protection and shine. Install your hygrometer and humidifier. You might also want to line the interior with Spanish cedar lining paper for extra aroma and humidity control.
Finishing Your Masterpiece
After all your hard work, it's time to admire your creation! Season your humidor for several weeks, monitoring humidity levels regularly. This allows the wood to acclimate to its environment and prevents warping or cracking. Once seasoned, carefully add your cigars, and enjoy the fruits of your labor. Remember, this is a process, and building a humidor is a rewarding journey. Don't be discouraged by initial challenges.
Commonly Asked Questions
Q: What kind of glue should I use for humidor construction?
A: Use a high-quality wood glue, specifically designed for furniture and ideally, one that's food-safe, given you'll be storing cigars inside.
Q: How often should I calibrate my hygrometer?
A: It's recommended to calibrate your hygrometer at least once a year, or even more frequently if you notice significant discrepancies in its readings.
Q: What is the ideal humidity level for cigars?
A: The ideal humidity level for most cigars is between 65% and 70%.
Q: Can I use any type of sealant?
A: No, you should only use sealants that are specifically designed for woodworking and are food-safe. Avoid anything that might leach chemicals into your cigars.
Q: How long does it take to build a humidor?
A: This depends heavily on your experience level and the complexity of your design. A simple humidor might take a weekend, while a more intricate project could take several weeks.
Happy building, and enjoy those perfectly-stored cigars!


0 comments:
Post a Comment
Note: Only a member of this blog may post a comment.