Craft Your Corner of Calm: A DIY Corner Pergola Guide
Escape the everyday hustle and create your own tranquil retreat with a DIY corner pergola. This guide provides detailed instructions, empowering you to build a beautiful and functional structure that perfectly complements your outdoor space. Forget expensive contractors; embrace the satisfaction of building something stunning with your own two hands. Let's transform a corner of your yard into a peaceful haven.
Planning Your Perfect Pergola
Before you grab your tools, careful planning is crucial. Consider the location carefully. Choose a spot that receives adequate sunlight for those sunny afternoons you’ll enjoy, but also provides some shade during the hottest part of the day. Measure the corner space precisely, sketching a design that suits the dimensions and your aesthetic preferences. Will you incorporate climbing plants? This impacts the design, requiring sturdier supports and potentially wider spacing between beams. Think about the overall styleâ€"rustic, modern, or something in betweenâ€"and choose materials accordingly. This initial phase is key to a successful project.
Material Selection: Strength and Style
The materials you select significantly impact the pergola's durability and aesthetic appeal. Pressure-treated lumber offers excellent rot resistance and affordability. Cedar and redwood are premium choices, known for their natural beauty and longevity but command a higher price. For a modern look, consider using metal posts and beams. Regardless of your choice, ensure all lumber is properly dried and free from defects. For the roof, you can opt for sturdy lattice panels, translucent polycarbonate sheets for diffused light, or even just leave it open for stargazing. Remember to factor in the weight of the chosen roofing material when calculating support needs.
Construction: A Step-by-Step Guide
Now for the exciting part! Begin by setting the corner posts securely into the ground using concrete footings. Ensure the posts are perfectly plumbâ€"using a level is non-negotiable here. Next, construct the top beams, attaching them to the posts using strong brackets and screws. Follow this by installing the supporting beams, creating a sturdy framework. You might need a helper for this stage to ensure accuracy and safety. Finally, attach your chosen roofing material, following the manufacturer's instructions. Take your time with each step, ensuring everything is aligned and firmly secured.
Essential Tools and Materials
- Post hole digger
- Level
- Measuring tape
- Drill with various drill bits
- Screws
- Brackets
- Concrete mix
- Lumber (posts, beams, and optional lattice)
- Safety glasses and work gloves
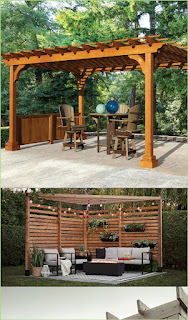
Personalizing Your Peaceful Retreat
Once the pergola’s structure is complete, the real fun begins! Add your personal touch with comfortable seating, lush potted plants, soft lighting, and perhaps even a small water feature to enhance the tranquil atmosphere. Consider incorporating climbing plants like ivy or jasmine to create a living, green canopy. Hang string lights for magical evening ambiance. This final phase allows you to fully personalize your new sanctuary, reflecting your individual style and preferences. Remember to regularly maintain your pergola by staining or sealing the wood to prolong its life and beauty.
Building a DIY corner pergola is a rewarding experience that transforms your outdoor space. By following this detailed guide and taking your time, you can create a peaceful retreatâ€"a place of calm and relaxation you'll cherish for years to come.
0 comments:
Post a Comment
Note: Only a member of this blog may post a comment.